
To delete the set codes (memory reset):

Nu is de ontvanger gereset. Nu opnieuw de zender koppelen:
To delete the set codes (memory reset):

Now the receiver is reset. Now re-pair the transmitter (make sure the lamp is off)
To delete the set codes (memory reset):
Then log on again;
To delete the set codes (memory reset):
The receiver is now reset. Now pair the transmitter again:
To delete the set codes (memory reset):
Now log on again:
What can happen in practice is that you have switched on the lighting with a transmitter. Someone passes the motion detector and an ON signal is sent (this has no effect as the light is already on). But after some time, an OFF signal from the motion detector will irrevocably follow and the light will go out.
One option to remedy this is to install 2 lamps; 1 combined with the motion detector and the other with the transmitter. You can also use an ACM-3000. If you connect it as below it will work!
The ACM-100 is a universal flush-mounting dimmer that can be placed in the ceiling (near the lamp) or in the wall (instead of the switch). Thanks to a unique lower value setting, it is suitable for:
For LED lights with a transformer or driver, you can currently try the ACM-100. This will be right in 80% of the situation. We have developed 2 so-called low voltage dimmers. A 1-10V and a 9-24V. These are intended to be placed between the transformer and the lighting.
The ACM-250 is a built-in dimmer that can be placed in the ceiling (near the lamp) or in the wall (instead of the switch). It is a phase cut dimmer (trailing edge) that has been specifically designed for dimming 12VV halogen.
Unfortunately, you cannot place an ACM-250 in a circuit that already has a dimmer. That would mean that there are 2 dimmers in one circuit and that does not work. When you would set the rotary dimmer to (suppose) 10%, the KAKU dimmer also gets 10% and it cannot function on that.
You could replace the rotary dimmer with a ‘normal’ rocker switch.
The nice thing is that you can also dim with the existing wall switch (rocker switch)!
Sure, that is possible. You can fit an ACM-2300 to the lamp. The existing switch will then remain functional (so you can continue to operate it). After installation, you can link the ACM-250 to a transmitter of your choice. This could be an extra wall switch (AWST-8800) for making a changeover circuit; a remote control (AYCT-102) and/or ICS-2000 which you can also use with an App.
But still with the existing switch!
The ACM-2300 is a switch. If you want to dim, you can use the ACM-250.
The great thing is that you can also dim with the existing wall switch (rocker switch)!
Another possibility would be to place an LED bypass module next to the lamp; this takes away some of the power and can make the lamps go off. ACM-250, however, is a more structural method.
The AWMD-250 is specially designed for use behind an existing single wall switch. By mounting it, you retain the functionality of the current switch but you add the ‘wireless switching’ function. You can now switch the lighting with the existing wall switch and with a transmitter of your choice, e.g. a remote control or a wireless wall switch.
The AWMD-250 is suitable for:
The AWMD-250 is a so-called 2-wire dimmer, which is sometimes difficult to use with LEDs. A good alternative is the ACM-250. You have to mount it in the ceiling near the lamp, but it often works much better.
The nice thing is that you can also dim with the existing wall switch (rocker switch)!
Our products are designed for single switches, unfortunately we do not have modules for double switches. If you wish, you can leave the switch off and then apply constant voltage to the lamps (i.e. connect the wiring of the former switch with a splice clamp, for example) and then install an AWMR-230/300 or AWMD-250 dimmer next to the lamp. You can then control this with the AWST-8802 double wall switch, which you place where the former switch used to be.
Unfortunately, this is the only possibility. The AWMR/AWMD can then be placed near the lamp as follows:
The AWMR-210 is an older generation of dimmers. Nowadays, much better versions of these are already on sale. The 1-to-1 replacement is the AWMD-250. The AWMD-250 is a so-called 2-wire dimmer, which can be difficult to operate with some LED lamps. We would actually recommend the ACM-250 for this. Although you have to mount it in the ceiling near the lamp, it often works much better.
The nice thing is that you can also dim with the existing wall switch (rocker switch)!
Another possibility would be to place an LED bypass module next to the lamp; this takes away some of the power and can make the lamps go off. ACM-250, however, is a more structural method.
The AWMR-230 is an older generation of switches. Nowadays, much better versions of it are available. The one-to-one replacement is the ACM-2300. It can be used in the ceiling or behind the switch. However, you will need a blue wire for this. Hence the possibility to use it in the ceiling as well.
The nice thing is that you can continue to use the existing wall switch (rocker switch). It even works in a hotel or two-way circuit.
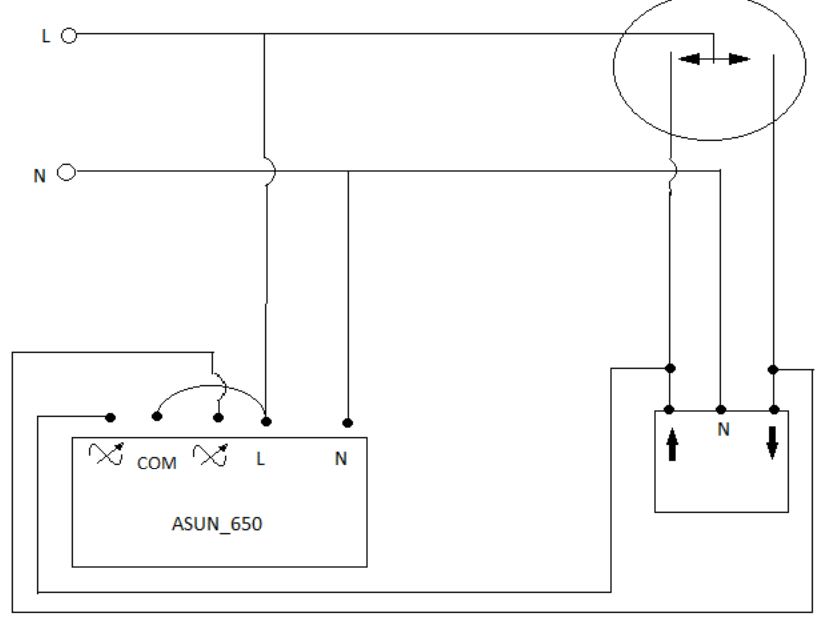
The ASUN-650 is a sunshade switch. You can control tubular motors (230V, 24V or 12V) with an ASUN-650. It replaces your hand control. Subsequently, you can link the ASUN-650 with a maximum of 6 different transmitters of your choice.
With an existing sun blind that already works with a remote control, you should remove the receiver unit. When this is removed, only the tubular motor remains. You can then combine this with the ASUN-650.
As there are so many different brands and versions, we are unfortunately not able to support the removal of the motor.
The blinds are controlled with a transmitter as follows:
OPEN/UP
CLOSE/DOWN
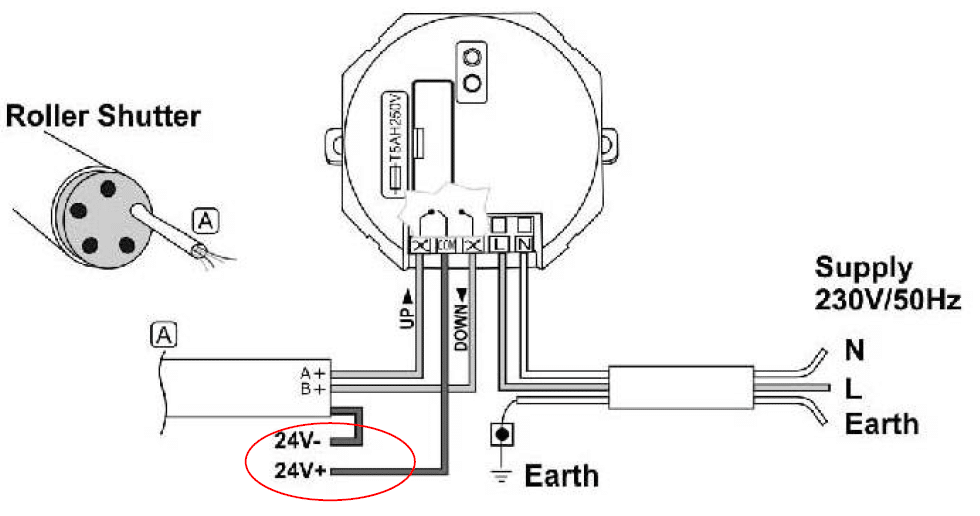
The ASUN-650 can switch not only 230V motors but also 24V motors.
Even 12V is possible if it concerns a so-called ‘dry port’:
It is possible to install the ASUN-650 in parallel with the existing rotary switch. However, there is a danger in this. The moment you switch manually and at the same time the motor is also controlled with the App, there is a chance that the motor burns out. We would like to point out that the installation is done at your own risk!
The motor can be connected to the Asun-650 as shown below.
Pay attention that you connect to the right symbols, these are on the ASUN-650 in a different order than indicated on the attachment.
You can connect the IR-receiver eye in the white port under the motor and the ASUN in the black one, both will work then.
Please note that the ASUN gives a signal of 2 minutes after operation within these 2 minutes, the IR receiver will not work.